Google: Conditionally Loading 3rd Party Tags in GTM with Concord Consent
Learn how to configure Google Tag Manager (GTM) triggers so third-party tags only fire after visitors grant consent via Concord, ensuring GDPR compliance regardless of Basic or Advanced Consent Mode.
Conditionally loading third-party tags in GTM with Concord consent
When using Google Tag Manager (GTM) with Concord, third-party tags that are not properly configured to respect consent can fire before consent is granted—potentially violating GDPR and other privacy regulations. This guide shows how to configure your tags to only fire when the visitor grants consent, regardless of whether you use Basic or Advanced Consent Mode.
Why this matters
Tags in GTM that aren't configured with consent checks will fire as soon as their trigger conditions are met (e.g., on page load). This happens regardless of your Consent Mode setting because:
- Google tags with built-in consent checks automatically respect consent state, but many third-party tags do not have these built-in checks.
- Third-party tags (analytics platforms, ad pixels, chat widgets, etc.) will fire immediately unless you explicitly add consent requirements.
How Concord updates consent in GTM
Concord pushes consent updates to window.dataLayer in two formats:
- On initial load — Concord fires both a Google
consent→updatecommand and aconsent_updatedcustom event with the visitor's current consent state. - When consent changes — If a visitor updates their preferences (e.g., grants consent after initially denying), Concord fires both events again with the new state.
This means you can use a consent_updated trigger to handle both scenarios: returning visitors who already have consent (fires on page load) and new visitors who grant consent later (fires when they opt in).
Example dataLayer payloads
Here's are some examples of what Concord pushes to the dataLayer. When consent is denied:
{
  "event": "consent_updated",
  "consent_state": {
    "analytics": "denied",
    "marketing": "denied",
    "functional": "denied"
  }
}
{
"0": "consent",
"1": "update",
"2": {
"ad_storage": "denied",
"ad_user_data": "denied",
"ad_personalization": "denied",
"analytics_storage": "denied",
"functionality_storage": "denied",
"personalization_storage": "denied",
"security_storage": "granted"
}
}When the visitor grants consent:
{
  "event": "consent_updated",
  "consent_state": {
    "analytics": "granted",
    "marketing": "denied",
    "functional": "granted"
  }
}
{
"0": "consent",
"1": "update",
"2": {
"ad_storage": "denied",
"ad_user_data": "denied",
"ad_personalization": "denied",
"analytics_storage": "granted",
"functionality_storage": "granted",
"personalization_storage": "granted",
"security_storage": "granted"
}
}Step 1: Set up consent defaults in GTM
Ensure you have set up consent defaults using Concord's GTM template or gtag integration. This is typically set to deny all storage types by default until Concord updates the values based on visitor consent.
For detailed setup instructions, see Understanding & Configuring Google Consent Mode (GCM) V2.
Step 2: Create a Concord Consent Updated trigger
Create a custom event trigger that fires when Concord updates consent:
- In GTM, go to Triggers and click New.
- Name it
Concord Consent Updated. - Set the trigger type to Custom Event.
- Set the event name to
consent_updated. - Save the trigger.
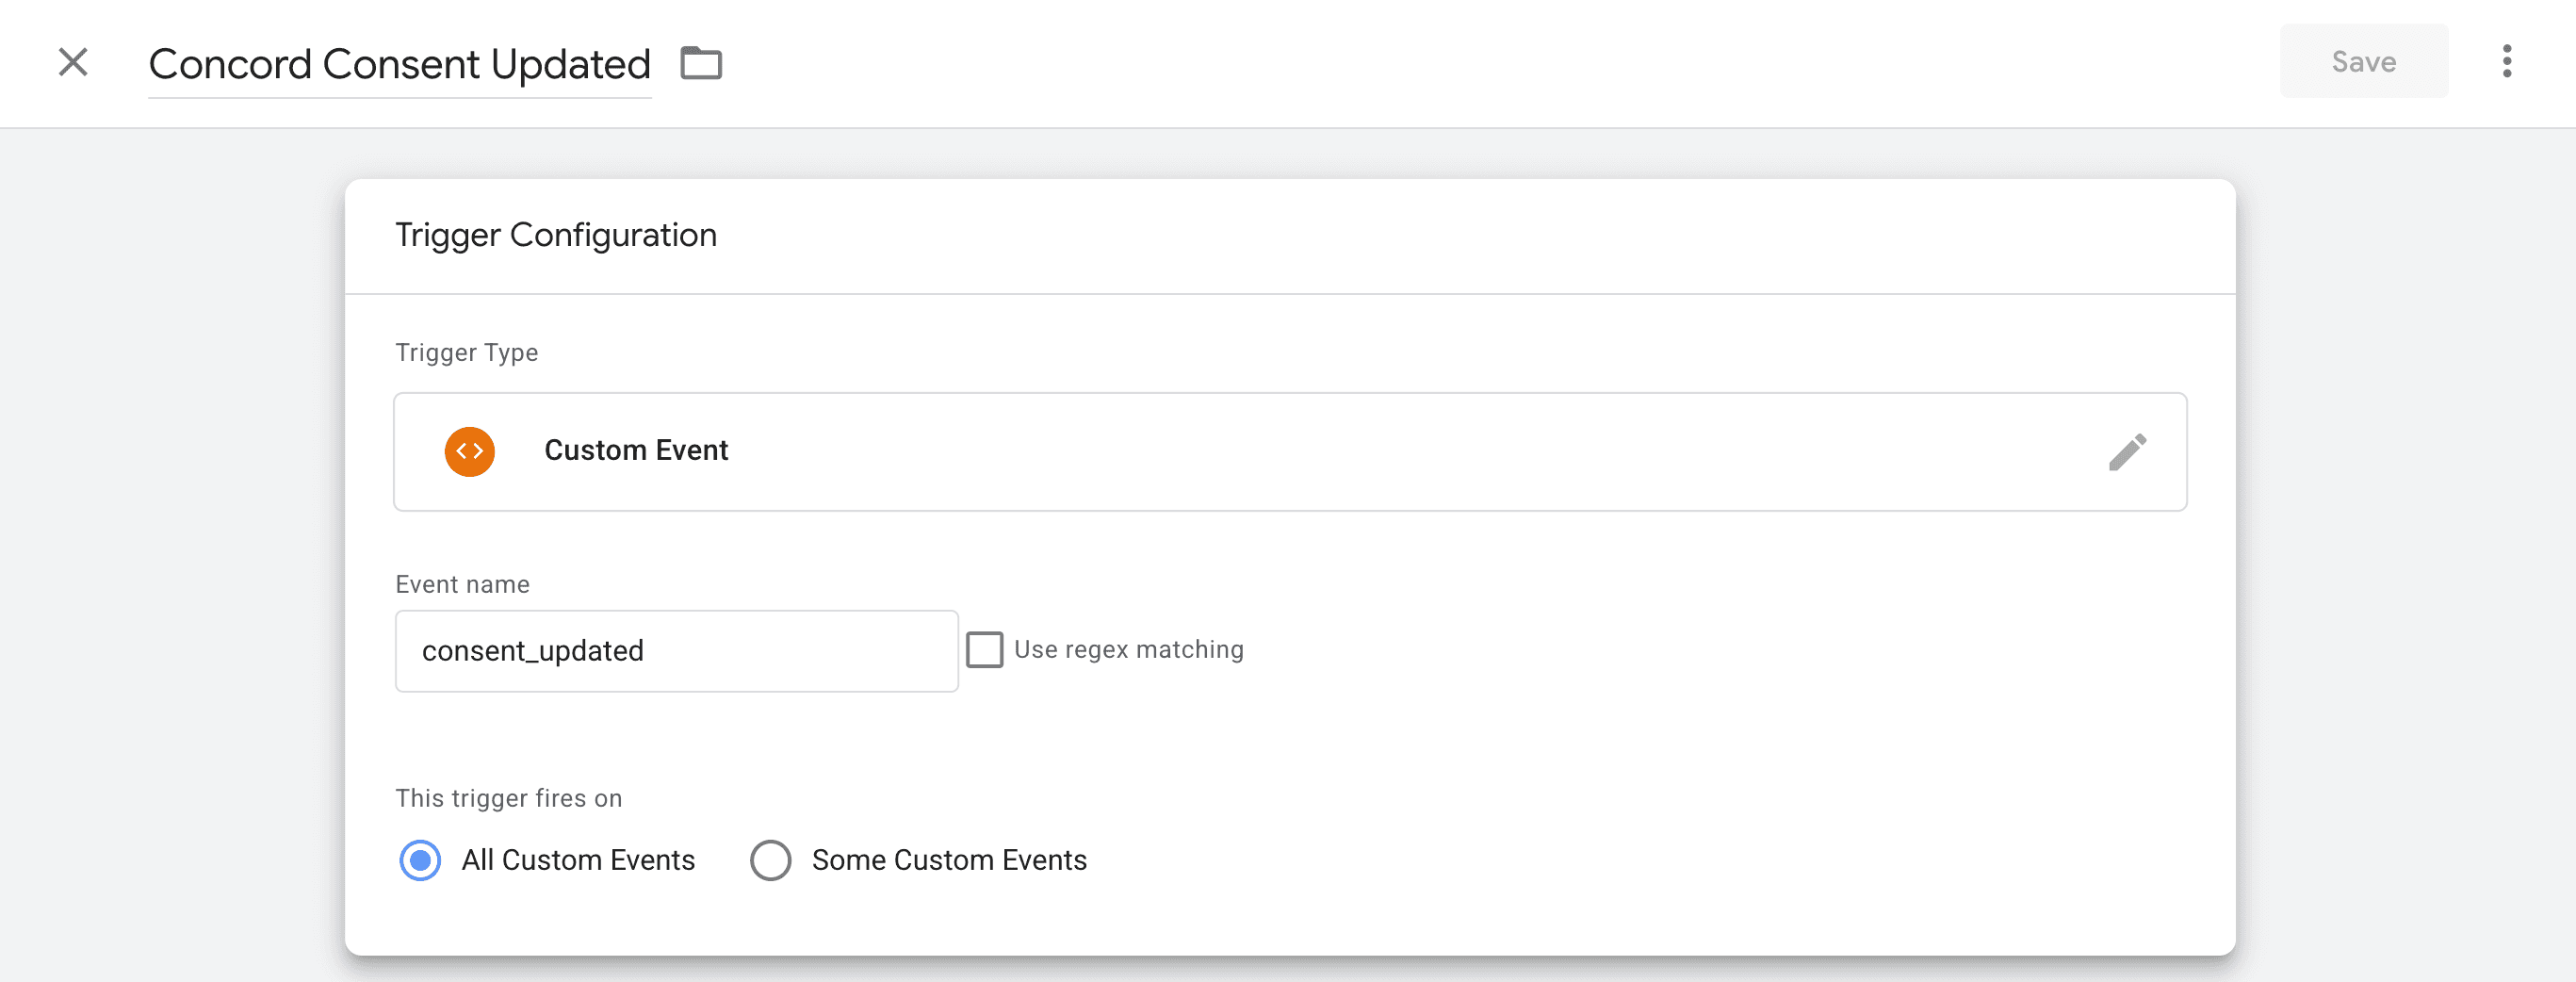
This trigger fires on every page load (with the current consent state) and again if the visitor changes their preferences.
Step 3: Configure consent checks on your tags
For each third-party tag that requires consent:
- Open the tag in GTM.
- Go to Advanced Settings > Consent Settings.
- Select Require additional consent for tag to fire.
- Add the appropriate consent types (e.g.,
ad_storage,analytics_storage,ad_user_data).
When a tag has these consent checks configured, GTM will not fire the tag until the required consent types are granted—even if the trigger conditions are met.
Step 4: Add the Concord Consent Updated trigger to your tags
For tags that use a standard trigger like "All Pages":
- Open the tag in GTM.
- Add the
Concord Consent Updatedtrigger you created in Step 2. - Save the tag.
- Once all tags are updated and saved, publish the new version of your GTM container.
This ensures that your tags fire when consent is granted mid-session. The built-in consent checks (Step 3) prevent the tag from firing until consent is actually granted, regardless of which trigger activates.
Note: If your tag already has an "All Pages" trigger or other types of triggers, you can typically keep them in place as the consent checks will block it until consent is granted. Adding the
Concord Consent Updatetrigger ensures the tag also fires if consent is granted after the initial page load.
Step 5: Validate in GTM Preview
- Enable Preview mode in GTM.
- Load your site with Concord active.
- Test scenario A (consent denied):
- Deny consent or don't interact with the banner.
- Confirm third-party tags do not fire.
- Grant consent and confirm tags fire after
consent_updatedappears in the Data Layer.
- Test scenario B (consent already granted):
- Grant consent, then refresh the page.
- Confirm tags fire on page load.